
Our recommended method for installing the toolchain is to use our VS Code extension "Lushay Code" as it is the easiest way to get setup and use the open-source toolchain on any operating system with the least moving parts. Full guide can be found here.
For those who are more confident in a terminal / more adventurous we have included the steps below on how to setup and use the toolchain manually.
Installing the Toolchain Manually
The installation process is a bit different per operating system.
Mac
The easiest way to setup all dependencies is by using brew which can be setup by running:
/bin/bash -c "$(curl -fsSL https://raw.githubusercontent.com/Homebrew/install/HEAD/install.sh)"Once installed we can use it to install python through pyenv which is a python version manager.
brew install pyenv
pyenv install 3.9.13
pyenv global 3.9.13
With python installed we can install apicula using the python package manager
pip install apyculaNote that the python package name is with a 'y' and not an 'i' like the project name.
Next we can install yosys using brew:
brew install yosysNextPnR is a bit trickier because we want to compile it against apicula. We can do this like so:
brew install cmake
brew install eigen

git clone https://github.com/YosysHQ/nextpnr.git

cd nextpnr

cmake . -DARCH=gowin -DGOWIN_BBA_EXECUTABLE=`which gowin_bba` -DPYTHON_INCLUDE_DIR=$(python3 -c "from distutils.sysconfig import get_python_inc; print(get_python_inc())")  \
-DPYTHON_LIBRARY=$(python3 -c "import distutils.sysconfig as sysconfig;import os;  print(os.path.join(sysconfig.get_config_var('LIBDIR'), [f for f in os.listdir(sysconfig.get_config_var('LIBDIR')) if f.endswith('.dylib') or f.endswith('.a')][0]))")

make
sudo make install
Last but not least we can install the openFPGALoader with brew:
brew install openfpgaloaderWindows
For Windows we recommend installing it using WSL 2 which can run Ubuntu on top of windows. To do this we need to first setup WSL, so open up a new powershell window as administrator (right click powershell icon from the toolbar and press run as administrator).
Inside we first need to enable WSL:
Enable-WindowsOptionalFeature -Online -FeatureName Microsoft-Windows-Subsystem-Linux This will enable and setup WSL, once done you will need to restart your computer. Once restarted you can reopen a powershell again as an administrator and run the following:
wsl --update
wsl --set-default-version 2
wsl --install -d Ubuntu-20.04
This will update the wsl kernel, make WSL 2 the default version and install Ubuntu 20.04. Once installed a new window should open prompting you to choose a username and a root password, this new window is the linux ubuntu terminal installed by WSL.
If there is a problem during the installation something about the kernel not being updated you may need to manually download the kernel update from here under step 4. After installing the update manually rerun wsl --install -d Ubuntu-20.04
Next we will need to install usbipd to allow us to connect USB devices to our ubuntu installation. The latest version can be found here https://github.com/dorssel/usbipd-win/releases At the time of writing this the latest installer is usbipd-win_2.4.0.msi
Once installed we need to also install the linux side of this, so in the ubuntu window (if it is closed you can get back to it by running wsl from a powershell window, it is worth noting that only on the initial install will it open in a separate window, when running wsl after the first time it opens in the same window replacing your regular shell). Inside the wsl terminal run the following:
sudo apt update
sudo apt upgrade
sudo apt install linux-tools-virtual hwdata
sudo update-alternatives --install /usr/local/bin/usbip usbip `ls /usr/lib/linux-tools/*/usbip | tail -n1` 20
This will update all packages and install the necessary tools to allow windows to mount the usb devices in linux using usbipd.
Next let's install all the dependencies and pip using the following commands from within the ubuntu wsl terminal:
sudo apt-get update
sudo apt-get install make build-essential libssl-dev zlib1g-dev \
libbz2-dev libreadline-dev libsqlite3-dev wget curl llvm \
libncursesw5-dev xz-utils tk-dev libxml2-dev libxmlsec1-dev \
libffi-dev liblzma-dev git cmake libboost-all-dev libeigen3-dev \
libftdi1-2 libftdi1-dev libhidapi-hidraw0 libhidapi-dev \
libudev-dev zlib1g-dev pkg-config g++ clang bison flex \
gawk tcl-dev graphviz xdot pkg-config zlib1g-dev

sudo apt install python3-pip
This will allow us to install apicula using:
pip install apyculaTo make sure the installed binaries from apicula are in the path you can run:
which gowin_bbaAnd it should print out the path to it, if it doesn't print out the location then we need to add it manually. First we need to find the folder where python installs it's packages to do this we can get the root user base:
python3 -m site --user-baseThis should print out a directory in my case it was:
/home/lushaylabs/.localBut in your case the username will be different (instead of lushaylabs) and it might be in a different folder. With this folder found we can add it to our path using:
export PATH=$HOME/.local/bin:$PATH$HOME is instead of writing /home/lushaylabs in my case, but will be automatically set to your home directory. So if you got a similar python location /home/<username>/.local then you can use the same line here. Otherwise replace it with the path printed by the python command adding on the sub-directory /bin. The :$PATH concatenates the current path to what we are adding to not override all the existing values.
With that you should be able to run which gowin_bba and get back the path.
Finally we can install yosys, nextpnr and openFPGALoader exactly like you would in the ubuntu installation:
Yosys using:
git clone https://github.com/YosysHQ/yosys.git
cd yosys
make
sudo make install
Next we will install nextpnr:
cd ~
git clone https://github.com/YosysHQ/nextpnr.git

cd nextpnr

cmake . -DARCH=gowin -DGOWIN_BBA_EXECUTABLE=`which gowin_bba`

make
sudo make install
Finally openFPGAloader can be installed as follows:
cd ~

git clone https://github.com/trabucayre/openFPGALoader.git
cd openFPGALoader
mkdir build
cd build
cmake ../
cmake --build .
sudo make install
To connect the tang nano 9k to the WSL shell you need to open up a powershell terminal as administrator and run the following command:
usbipd.exe wsl listYou should see a device named something like the following:
USB Serial Converter A, USB Serial Converter BTake its hardware id or its bus id and run one of the following commands:
usbipd.exe wsl attach -i 0403:6010
usbipd.exe wsl attach -b 1-1
The first one is an example if using the hardware id (if the hardware id is 0403:6010), and the second is an example using the bus id if the bus id was 1-1. You only need to run 1 of these you can also add -a to auto-reattach if you unplug and replug the device, although you will need to leave the terminal open in the background if you do this.
After this you should see it say attached if you run usbipd.exe wsl list again.
As a final step here I would also run the following from within ubuntu wsl terminal:
sudo chmod 666 /dev/ttyUSB0
sudo chmod 666 /dev/ttyUSB1
(names might be different if you have other devices connected) but this will make it so that you can access the serial terminal for example without being root.
Ubuntu
These are the steps for ubuntu 22.04:
sudo apt-get update
sudo apt-get install make build-essential libssl-dev zlib1g-dev \
libbz2-dev libreadline-dev libsqlite3-dev wget curl llvm \
libncursesw5-dev xz-utils tk-dev libxml2-dev libxmlsec1-dev \
libffi-dev liblzma-dev git cmake libboost-all-dev libeigen3-dev \
libftdi1-2 libftdi1-dev libhidapi-hidraw0 libhidapi-dev \
libudev-dev zlib1g-dev pkg-config g++ clang bison flex \
gawk tcl-dev graphviz xdot pkg-config zlib1g-dev
The above will install all the pre-requisites for the toolchain. Next we need to install python which we can do by first installing pyenv:
curl https://pyenv.run | bash
echo 'export PYENV_ROOT="$HOME/.pyenv"' >> ~/.bashrc
echo 'export PATH="$PYENV_ROOT/bin:$PATH"' >> ~/.bashrc
echo -e 'if command -v pyenv 1>/dev/null 2>&1; then\n eval "$(pyenv init -)"\nfi' >> ~/.bashrc
This will install pyenv, you will need to restart your terminal or source ~/.bashrc for the changes to take effect.
Once restarted we can use pyenv to install python as follows:
pyenv install 3.9.13
pyenv global 3.9.13
And with python installed we can now download apicula:
pip install apyculaWith that installed we can install yosys using:
git clone https://github.com/YosysHQ/yosys.git
cd yosys
make
sudo make install
Next we will install nextpnr:
cd ~
git clone https://github.com/YosysHQ/nextpnr.git

cd nextpnr

cmake . -DARCH=gowin -DGOWIN_BBA_EXECUTABLE=`which gowin_bba`

make
sudo make install
Finally openFPGAloader can be installed as follows:
cd ~

git clone https://github.com/trabucayre/openFPGALoader.git
cd openFPGALoader
mkdir build
cd build
cmake ../
cmake --build .
sudo make install
Other Recommended Software
Besides for the toolchain itself there is some other software which can aid in the development of FPGA cores, and will be used throughout this series.
VSCode
This is a popular light-weight cross-platform editor with many plugins some of which specifically for FPGA development. The editor itself can be downloaded from here.
Once installed, you can open it up and go to the Extensions tab to install plugins. I personally use the following extensions:
- Verilog-HDL/SystemVerilog - provides syntax highlighting support for Verilog
- WaveTrace - provides built in waveform viewing which can be used for debugging.
On windows it is worth setting the default terminal to WSL. This can be done by opening a new terminal window and then next to the + icon to create a new terminal window you can click on the little arrow and choose the select default profile option to select the WSL ubuntu option. This way when you open a new terminal it will already be from within wsl.
IVerilog
IVerilog or Icarus Verilog is a version of verilog which is can be used to create tests / simulations easily for your verilog generating a waveform file which can be visually debugged. To install it:
Mac
brew install iverilogUbuntu / Windows WSL
sudo apt-get install iverilogUsing the Toolchain
As an example using the toolchain let's take the counter.v file from our getting started guide:
module counter
(
input clk,
output [5:0] led
);
localparam WAIT_TIME = 13500000;
reg [5:0] ledCounter = 0;
reg [23:0] clockCounter = 0;
always @(posedge clk) begin
clockCounter <= clockCounter + 1;
if (clockCounter == WAIT_TIME) begin
clockCounter <= 0;
ledCounter <= ledCounter + 1;
end
end
assign led = ~ledCounter;
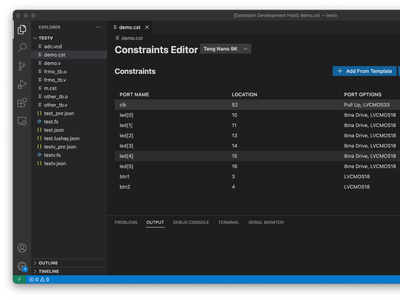
endmoduleWe will also need the constraints file called tangnano9k.cst:
IO_LOC "clk" 52;
IO_PORT "clk" PULL_MODE=UP;
IO_LOC "led[0]" 10;
IO_LOC "led[1]" 11;
IO_LOC "led[2]" 13;
IO_LOC "led[3]" 14;
IO_LOC "led[4]" 15;
IO_LOC "led[5]" 16;
The first step to building our project is to synthesize the verilog using yosys.
We can do this manually by running yosys from the terminal that has navigated to the project directory (vs code has a built-in terminal which defaults to here). Once inside we can read our verilog file by running the yosys command read_verilog counter.v
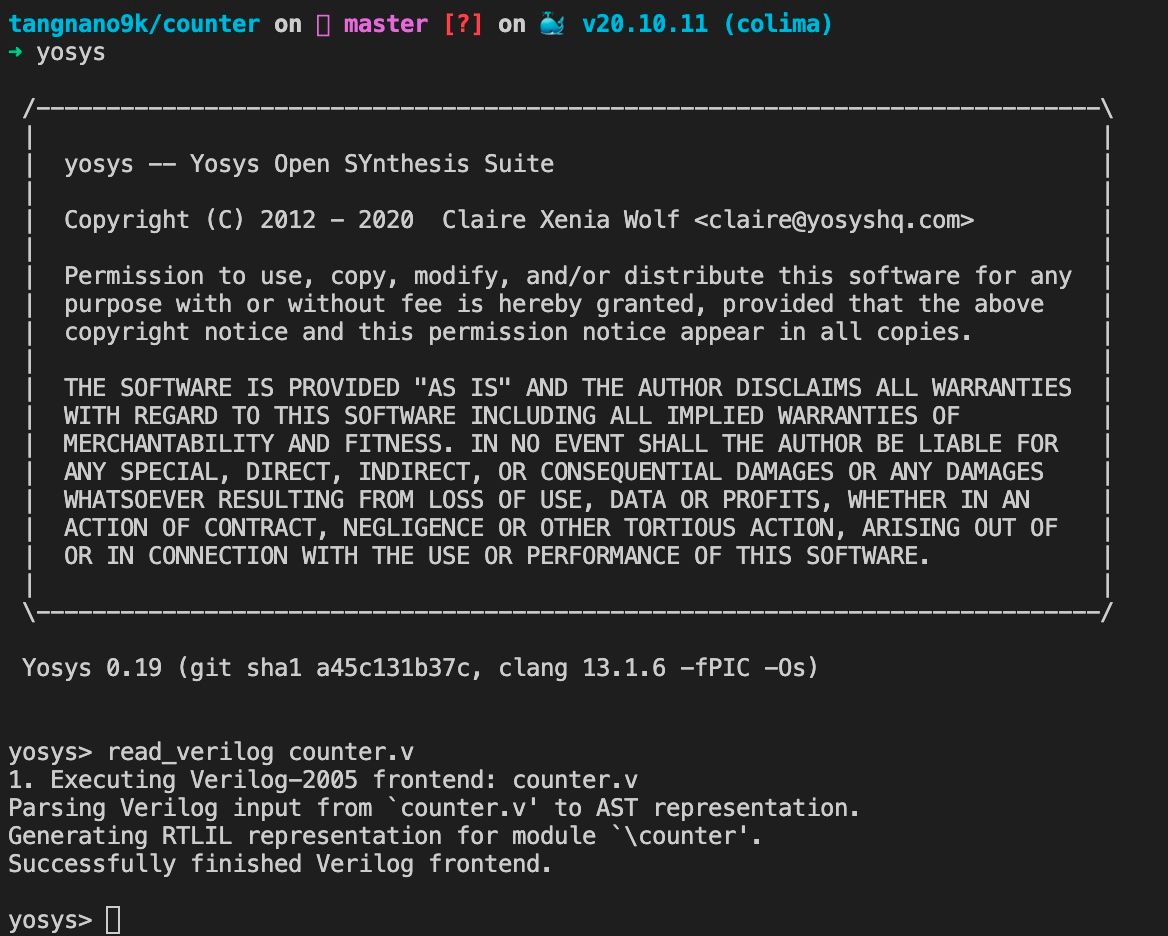
You should see the file successfully being read. Now we need to synthesize the code using the synthesizer for gowin-based FGPAs, we can do this with the synth_gowin command (for a list of all commands you can type help in yosys). The full command should be:
synth_gowin -top counter -json counter.jsonThe -top option selects which module is the "main" module or entrypoint module and the json option tells yosys to export a json file with the results of the synthesis.
If all went well you should see a new file in your project directory called counter.json you can now exit yosys by typing exit
The next step is placing and routing using nextpnr. The full command needed looks like this:
nextpnr-gowin --json counter.json --freq 27 --write counter_pnr.json --device GW1NR-LV9QN88PC6/I5 --family GW1N-9C --cst tangnano9k.cstThe json parameter defines the input json we received from yosys, freq sets the frequency in Mhz and the write parameter defines the output file or where nextpnr should place the results of this stage. Device and family variables tell nextpnr which gowin FPGA we are using, the information above is the device and family for the FPGA on the tangnano 9k. Finally the last parameter is the constraints file we created.
After running this you should now have a new file counter_pnr.json. The final step is to convert this routed information into the bits format that the FPGA itself requires. This can be done using gowin_pack from apicula.
gowin_pack -d GW1N-9C -o counter.fs counter_pnr.jsonThe first parameter -d is to specify which device family we are using the -o is to define the output file with the binary data and the final parameter (no flag) is the json file output from nextpnr.
Again after running this you should have the final binary file (in ascii format) counter.fs
Programming it to the TangNano
Now that we have the bitstream file, we can program it to the tang nano in order to make apply the configuration on the FPGA. With the tang nano we have two main options for programming, we can either program to memory which is super fast and will apply the changes, but if the device restarts it will lose this configuration.
The other option is to program to flash, which is slightly slower but will make the FPGA retain the configuration after restarts (or more accurately make it reload the configuration after restart automatically).
In our example let's program the flash we can do this with the following command (may require sudo permission):
openFPGALoader -b tangnano9k -f counter.fsThe first parameter is the board we are using, the second parameter tells it to use the flash option (leave off the -f to program to memory instead) and the final parameter is the fs file generated by gowin_pack.
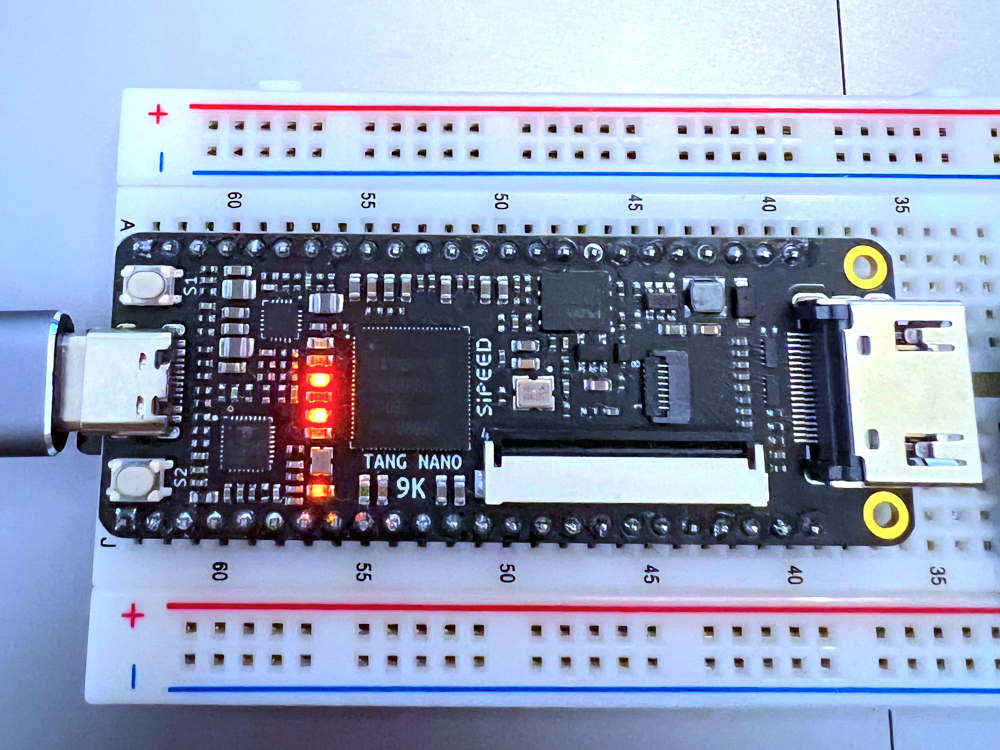
If all went well you should now see the tangnano counting up over it's LEDs.
Automating the Build Process
To automate the build process we can create a simple file called Makefile which will define targets or actions. Here is a simple example we can use for our project.
BOARD=tangnano9k
FAMILY=GW1N-9C
DEVICE=GW1NR-LV9QN88PC6/I5

all: counter.fs

# Synthesis
counter.json: counter.v
	yosys -p "read_verilog counter.v; synth_gowin -top counter -json counter.json"

# Place and Route
counter_pnr.json: counter.json
	nextpnr-gowin --json counter.json --freq 27 --write counter_pnr.json --device ${DEVICE} --family ${FAMILY} --cst ${BOARD}.cst

# Generate Bitstream
counter.fs: counter_pnr.json
	gowin_pack -d ${FAMILY} -o counter.fs counter_pnr.json

# Program Board
load: counter.fs
	openFPGALoader -b ${BOARD} counter.fs -f

.PHONY: load
.INTERMEDIATE: counter_pnr.json counter.json
The first three lines simply define variables with the board name device name and device family, same values we used when we compiled it manually.
The next line defines the first target. The name doesn't matter by default when running make if a specific target wasn't specified it will run the first target which in our example is called all.
The format for targets are:
<target name>: <target dependencies>
	<target commands>
So in this target we have no commands to run, but we are saying that it depends on another target called counter.fs. Make will automatically detect that the target name matches a file name and based on whether the file exists or not will know what it needs to do left.
So we essentially created here a dependency chain where:
- counter.fs requires counter_pnr.json in-order to run.
- counter_pnr.json requires counter.json in-order to run.
- counter.json requires counter.v in-order to run.
So the first target that will actually be run is the target counter.json since we will only have the .v file and not the json / fs files.
Inside each of the targets for you can see we are running the same commands we ran manually. The only difference maybe being that with yosys we are using the -p parameter to pass it the commands inline, instead of entering yosys and typing them manually.
The last two lines are directives for Makefile. The .PHONY directive will tell makefile that the load target is not meant to represent a file. and the .INTERMEDIATE directives tell Makefile that these are files that are not really needed and can be deleted after compilation.
By defining the make file in this manner, Makefile itself can understand when the underlying verilog file has changed and when a new compilation is required on it's own.
To test it out, delete the two json files and fs file we created manually, and from the terminal run make.
You should see it recreate the .fs file and delete the 2 json intermediate files. Running it again you should see that there is nothing to do because it sees none of the dependencies have changed.
Running make from the terminal should recompile everything now, and then running make load (maybe with sudo) will select the load target and program the updated fs file to our FPGA.
It is worth noting we could have also directly ran make load without first running make, since the counter.fs is also a dependency of load and it would have seen the change in the verilog file re-compiling it automatically.
Conclusion
Setting up the open-source toolchain manually can pose its challenges but ultimately it gives you a much better understanding of the toolchain and more control on how and where to set it up.
I would like to thank you for reading and if you have any questions / comments feel free to leave a comment below or reach out on twitter @LushayLabs.
All the code from the above example along with all our other tang nano projects are available in our github repo here and each project has a Makefile so it supports the manual toolchain installation. If you would like to order a tang nano 9K and support this site you can do so from our store.
