
This extension for VS Code automates the execution of the open source FPGA toolchain. Lushay Code wraps the prebuilt binaries from OSS-Cad-Suit and provides a visual way to both configure and use the open source toolchain from within visual studio code.
Installation
The plugin can be installed from within Visual Studio Code, just go to the extensions page and search for "Lushay Code".
Once installed you will see a new button on the right hand side of the bottom bar that says "FPGA Toolchain". This is the button used to access all the functionality of the extension.

Clicking on the button for the first time will open up a pop-up where we can setup OSS-CAD-Suite. To do this you need to download the version of OSS-Cad-Suite for your OS from here and extract it somewhere.
Once downloaded and extracted, click the "FPGA Toolchain" button again and click on "Setup Now" this will open up a file picker where you have to select the newly extracted folder called oss-cad-suite.
On Windows you also need to replace the default driver using Zadig for JTAG Debugger (Interface 0) to WinUSB driver. More info on the installation process and this driver change can be found in our getting started guide here.
And on Ubuntu you will need to give permissions to you user so we can run openFPGALoader without being root. To do this you need to run the following from a terminal:
curl -sSL https://raw.githubusercontent.com/lushaylabs/openfpgaloader-ubuntufix/main/setup.sh | shAnd then once completed you will need to log-out and log back in so that the user permissions take effect and you will need to unplug and replug in the tang nano board.
Usage
Once installed you can now simply open up a new folder in VSCode, add verilog files along with a constraints file (.cst file). Then click on the "FPGA Toolchain" button again and you should get a menu that looks like the following:

Selecting "Build and Program" will automatically synthesize all verilog files (except files ending in _tb.v which it considers testbenches) and will run yosys, nextpnr-gowin and apicula to generate the final bitstream, it will then also run openFPGALoader to program the new gateware to the tang nano 9k.
Selecting build only will skip the programming stage, and selecting program only will only run openFPGALoader.
By Default you will need 1 module called top as the top module in your verilog project.
Pressing "Open Serial Console" will open a new terminal with a serial console to the Tang Nano. The default baud rate is 115200.
Finally the "Open Terminal" button will open up a terminal pre-configured with OSS-Cad-Suite. This is useful if you want to directly interact with the open-source toolchain or do something not yet supported.
Besides for these features if you have binary files to program to the external flash on the tang nano you will have an option called "External Flash" and if you have testbench files (_tb.v) you will also have an option called "Run Testbench".
"External Flash" will run openFPGALoader to program the external flash with the binary file, and "Run Testbench" will generate the testbench executable using iVerilog and run the testbench with vvp.
CST Editor
When opening a .cst file it will open by default with the visual constraints editor. Here you have a table with the current constraints and two main buttons "Add Constraint" and "Add From Template".
The "Add From Template" button is to easily add constraints for built in hardware on the development board, things like LEDs, buttons, Flash IC, etc. The "Add Constraint" button is to add a new custom constraint.
When you add a new constraint (via either method) you will see it show up in the table as a row. You can click on any row to edit it in the side panel.

You can edit the name, location and other options on the constraint. For location you can either enter the pin number if you know it, or press the "Select IO Pin" to visually select the pin from the board.
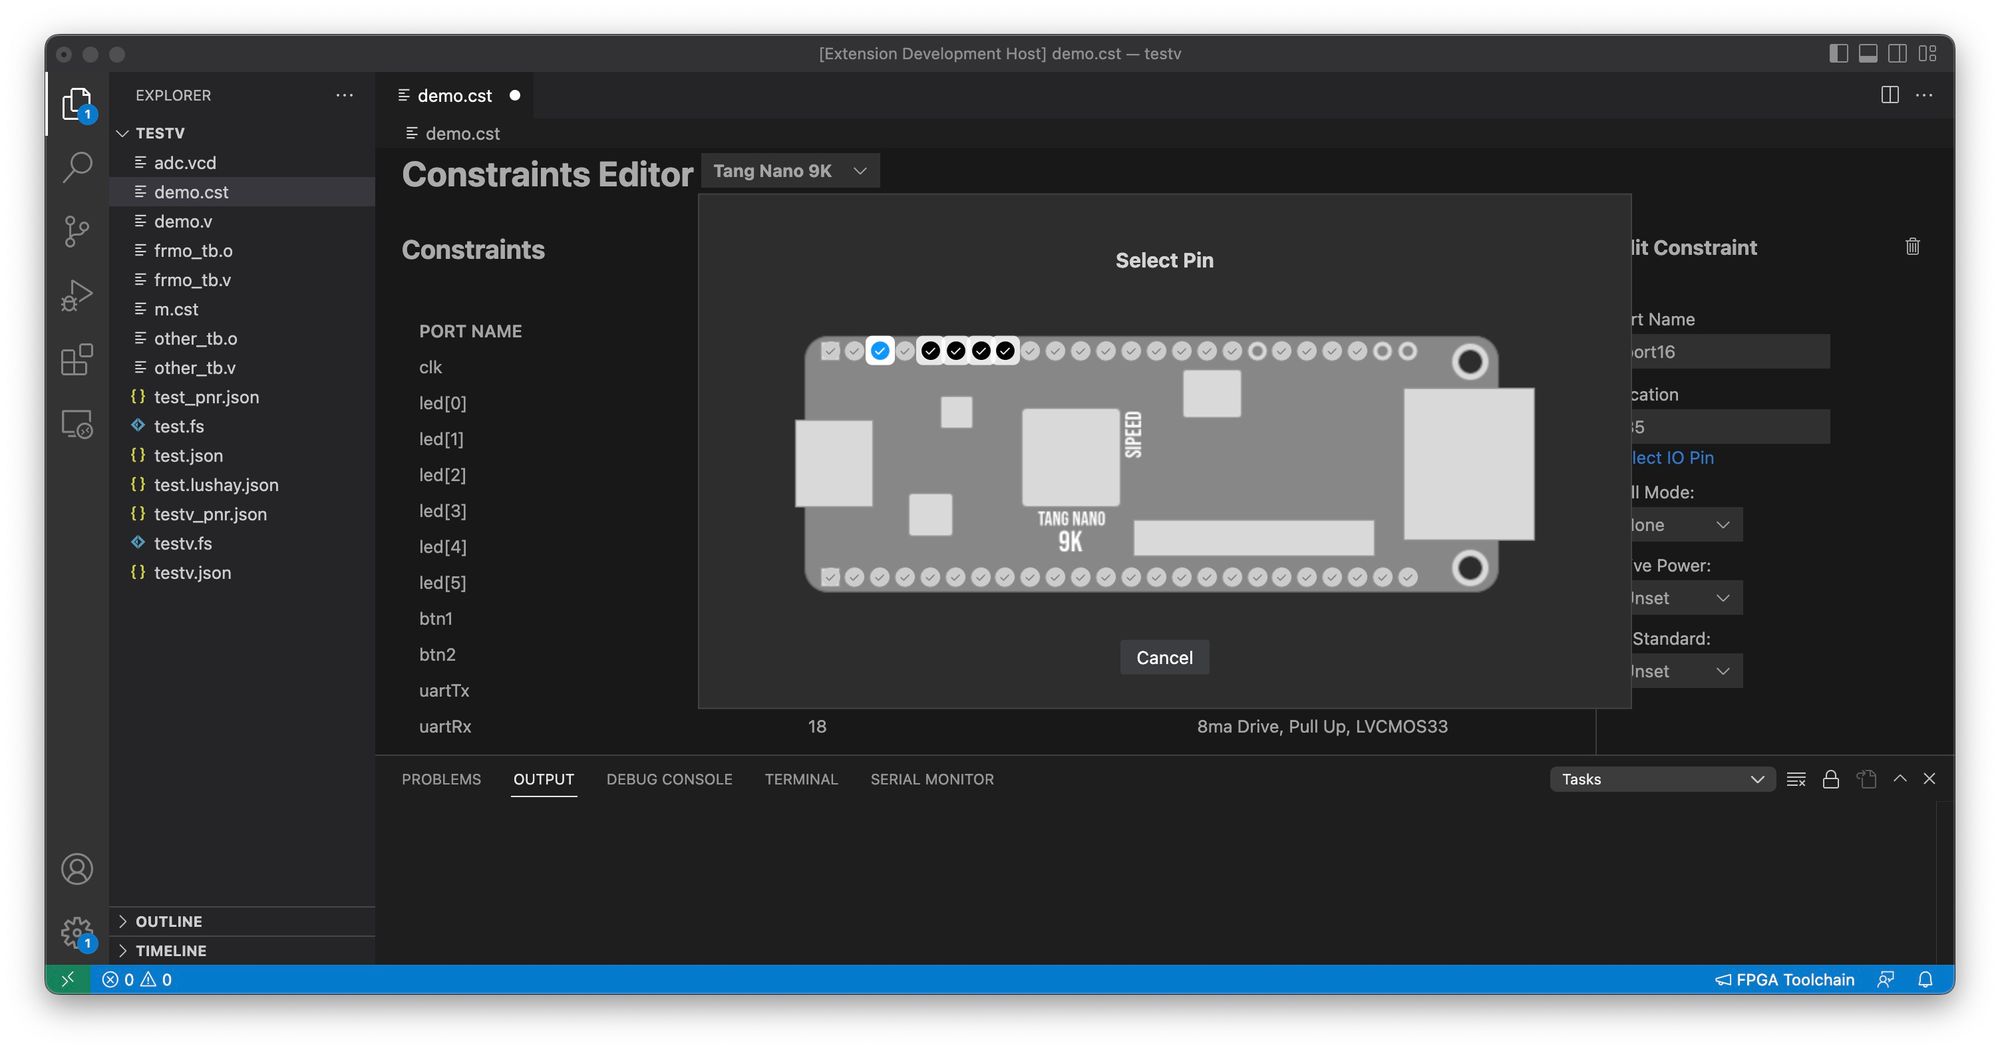
Both the "Select IO Pin" and "Add From Template" are board specific so you have to choose the correct board from the dropdown at the top.
If you prefer to edit your .cst files manually using a text editor you can right click on the file and press "Open With". This will open a dropdown with options and there is even an option to set the default editor so it will always use your preference in the future.
Linting
To enable linting you must select your project file from the bottom bar by clicking on the button that says "<Auto-Detect Project>" by default. This let's the linter know which files are included in the build. If you don't have a project file (.lushay.json file) then linting is enabled and will use all verilog files as input for the linter.
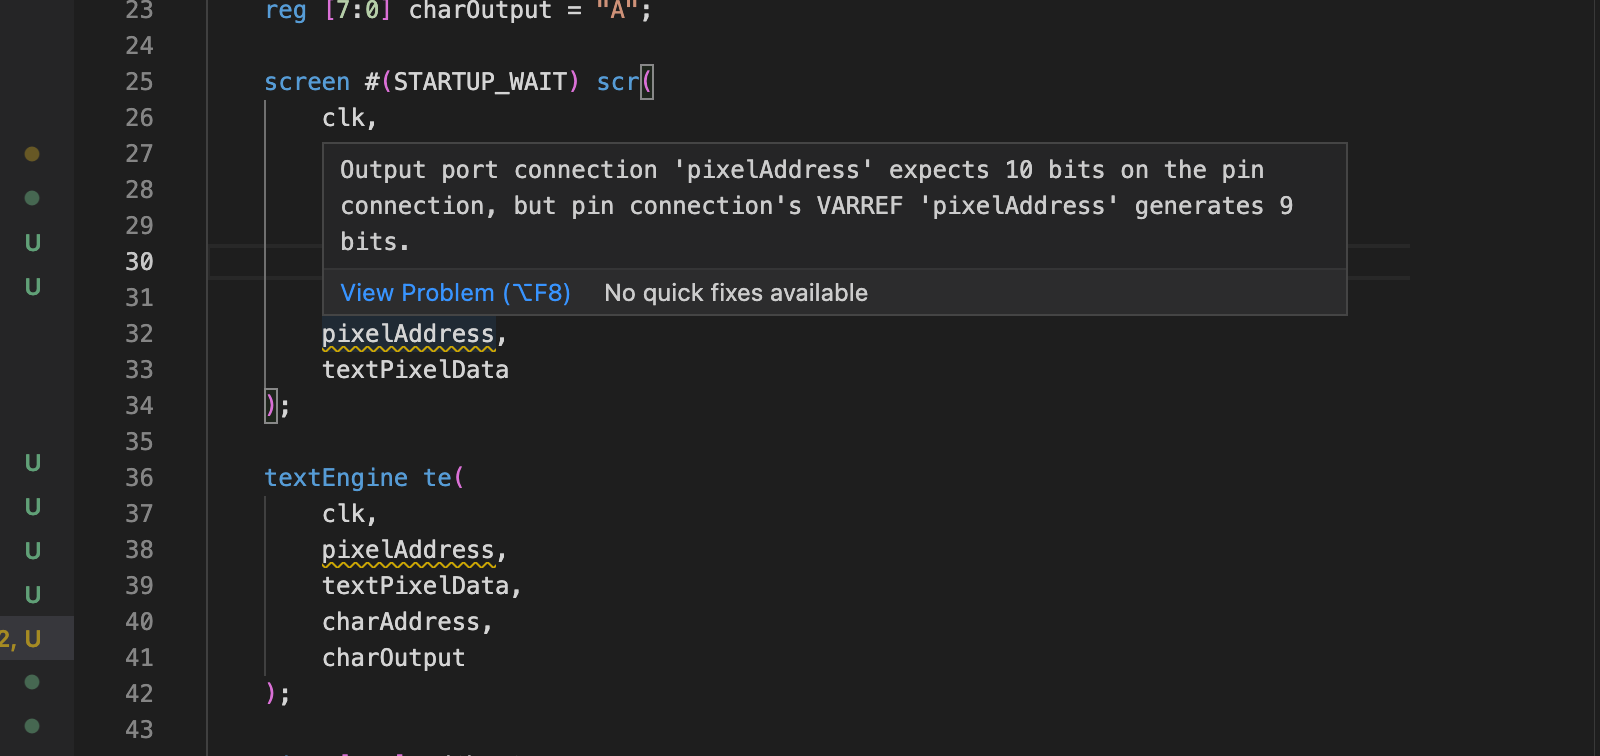
Once you have your project selected then the extension will automatically run the linter and update results every time you save a file. Linting is powered by verilator which is part of the open source FPGA toolchain.
Configuration
If you want to alter the default behaviour of the plugin you need to create a new file called <name>.lushay.json for example counter.lushay.json. The name can be whatever you want, and you can have multiple project files in the same project folder. If you have multiple then you will be prompted to choose which one you want to use from a dropdown when clicking on the "FPGA Toolchain" button.
It is worth noting that when adding a project file (.lushay.json file) then it anchors the project to that location. What I mean by this is that if by default it will take all verilog files in the open folder, once you add a project file it will only take files in the same folder or lower.
So if I put the project file into a folder called src then it will only search for verilog files inside the src folder or in subdirectories under this folder.
Inside the project file you can add any of the following settings to override the default behaviour:
| Key | Description | Type | Default |
|---|---|---|---|
| name | Overrides the project name | string | Either the project file's name or the folder name |
| includedFiles | The verilog files to synthesize | "all" or string[] | "all" which means all non testbench verilog files you can also specify file paths relative to the project file in an array |
| externalFlashFiles | Binary files to flash to the external flash | string[] | [] |
| top | The name of the top module for synthesis | string | "top" |
| constraintsFile | Path to constraints file relative to project file | string | finds first constraint file in directory |
| programMode | Whether to program to flash or ram | "flash" or "ram" | "flash" |
| testBenches | Paths to test benches relative to project file | "all" or string[] | "all" which means all '_tb.v' files |
| nextPnrGowinOptions | Extra flags for the nextpnr-gowin stage | string[] | [] |
| synthGowinOptions | Extra flags for the synth-gowin stage in yosys | string[] | [] |
| baudRate | Baud Rate for serial console | number | 115200 |
| board | The FPGA board being used | one of the supported board names | tangnano9k |
It is worth noting all fields are optional and have default values if not set. Also when specifying file paths for fields like includedFiles, constraintsFile, testBenches etc.. The paths should either be absolute paths or relative to the project file.
Board names supported are:
tangnano9k
tangnano4k
tangnano1k
tangnano
icebreaker
icestick
orangeCrab
Here is an example of the project file in our counter example:
{
    "name": "counter",
    "includedFiles": ["counter.v"],
    "constraintsFile": "tangnano9k.cst",
    "top": "counter"
}
But for example if counter.v and tangnano9k.cst are the only two files I could have achieved the same thing with a file called counter.lushay.json as follows:
{
    "top": "counter"
}
Since after filling in defaults we would get:
{
    "top": "counter",
    "includedFiles": "all",
    "constraintsFile": "tangnano9k.cst",
    "name": "counter"
}
constraintsFile would be set since by default the extension will take the first .cst file it finds, and the name it takes from the project file.
If no CST file is found it will check for other toolchains like .lpf for project trellis and .pcf for project icestorm.
Module Debugger
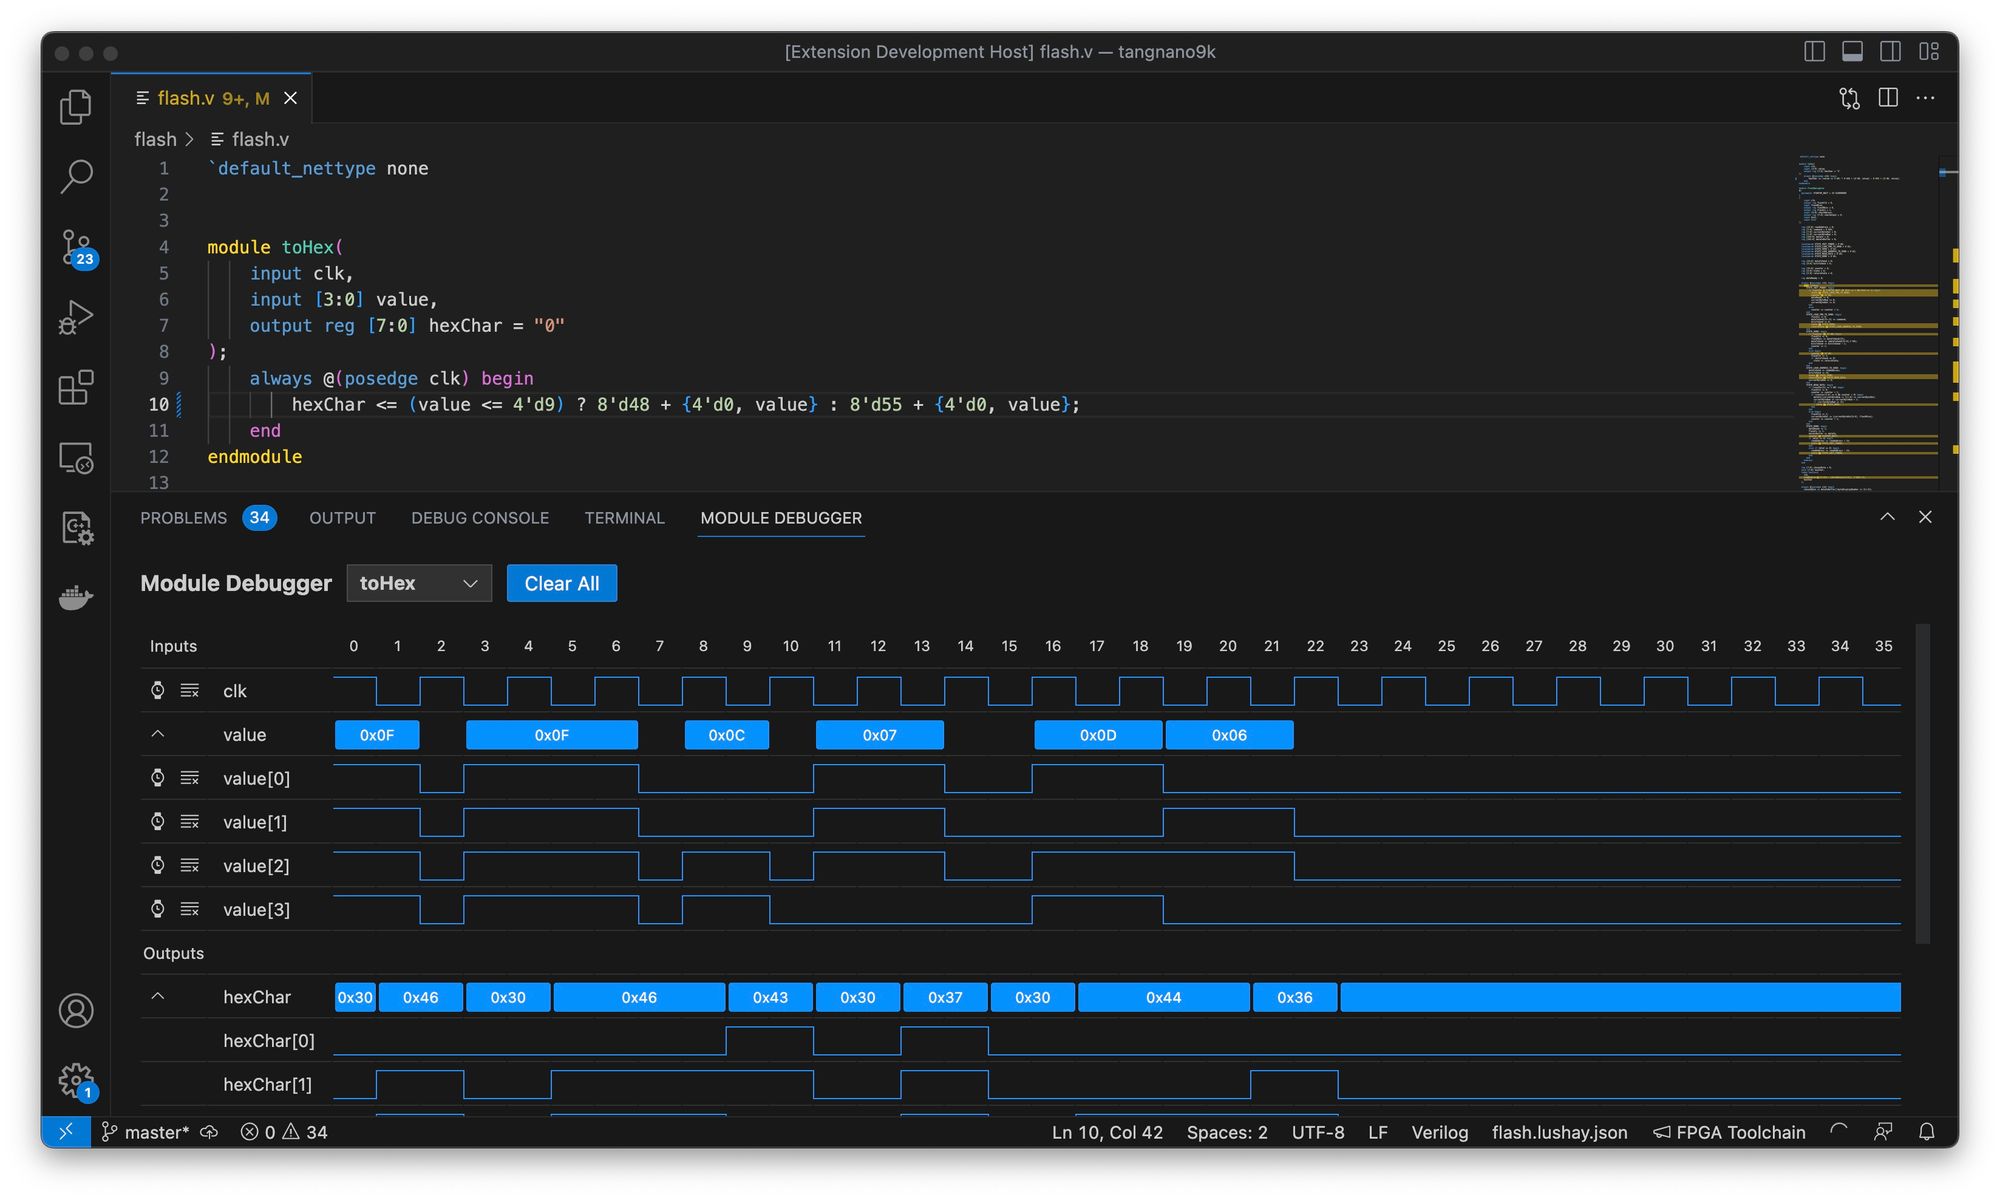
By opening any verilog file you should see a new panel next to the toolchain output panel called Module Debugger. Once open the you should see a dropdown box where you can select which module from the currently open file you would like to debug (relevant for files with more then 1 module inside).
Once you have your module selected the panel will show you a table with all input and output ports. The input ports can be modified visually by clicking and dragging on single bit rows, or by double clicking on multi-bit rows, whenever an input is changed / the verilog code updated the simulation will be run updating the outputs.
There is a button on each single bit line with a watch icon, this can be used to pulse the signal of that input on and off, useful for clock signals, it can be clicked multiple times to shift the phase of the signal by 1 time frame. You can also use the `alt` key while dragging to alternate between high and low on a line to create a specific area with a clock signal.
The other button on a single-bit line clears the row setting all time frames low.
For multi-bit rows you have a button to expand / contract the value to display the individual bits, and on the multi-bit row you will get the value of all bits together. You can double click any empty time frame on the multi-bit row to create a new value. Values can be dragged from each end to extend or shorten their length and you can double click a value box to open a text input where you can enter a new value in hex.
Inputs will be persisted for each module and are stored in a `.dbgmodule` file next to the source verilog file, and you can clear all signals in the current module by using the "Clear All" button at the top.
Cloud Builds
"Cloud builds" use our servers to synthesize and generate the bitstream for your project. Currently this is only supported for tang nano boards and the cloud will use the official Gowin EDA (educational edition) to synthesize your bitstream.
This allows you to use features not yet covered by the open source toolchain / to compare the results from the open-source toolchain to the official toolchain. This option still requires OSS-CAD-Suite to be setup as it is used for preparing the files for the cloud build.
To setup cloud builds you need to go to the extension settings for the Lushay Code extension. You can get there in VSCode by going to the extensions tab and clicking on the Lushay Code extension and then from the Cog-wheel you can select "Extension Settings". Alternatively you can go directly to the settings and search for "lushay" to filter all the settings to only the relevent ones.
With the settings open you can select "cloud" as your prefered toolchain, and you must enter an API key for the cloud service. You can recieve an API key by signing up for our Cloud service here.
With the settings configured you can then build your project regularly using the "FPGA Toolchain" button and instead of using the local toolchain it will build the bitstream remotely.
Conclusion
The main goal of this extension is to make the process of FPGA development with the open-source toolchain more accessible. It is the culmination of feedbacks from many individuals who have tried the previous method and expressed their feedbacks.
With even more usage and feedback the extension can develop to further improve and lower the boundary to entry even more into the world of FPGA Development.
You can also take a look at our github repo here which includes all the example projects from our Tang Nano series all of which are compatible with the Lushay Code extension.